

Paver Brick Prequel: Casting the Mold
/By Canne Holladay
About a year ago former assistant, Rickie Barnett, wrote a blog about making paver bricks from glaze waste called Turn Your Waste into Want. This process is a fun way to reuse common waste clay and glaze materials that often accumulate around the studio. We’ve got some new folks assisting in the studio this year so it seemed appropriate to make some new brick molds, and like a great opportunity to share with you more about the brick making process.
Green clay formed into "brick" shape- ready to be cast

Walls around the original
making shared walls

ready to cast

mixing plaster

pouring plaster

smoothing the surface

peeling off the walls

Forming secure walls around the "brick" in order to case

Making sure the corners can hold the weight of the plaster.

Smoothed walls to hold the plaster around the "brick"
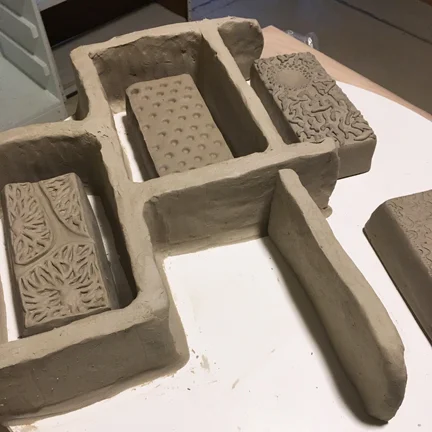
The prequel to pressing bricks for your patio or garden requires casting a mold from which the bricks can be pressed. We started by paddling out hunks of clay the size of a standard brick, using an actual brick for scale. These brick blanks were then decorated to create a positive form for casting the mold. When creating your positive brick there are a few tips to be aware of. First, these positives can be built solid since ultimately the clay will be dug out and likely trashed. Second, it is important that there are no undercuts in the design since the presence of this feature will prevent the brick from releasing from the mold later on. Third, the positive should be cast at leather hard, so don’t let it dry out too much. The following instructions will take you step by step through casting your mold.
1. Find a board with a surface that the clay will easily stick to. We used a large throwing bat made of an old countertop... (particle board is covered with formica.) Arrange your leatherhard clay bricks over the surface of the surface so that there is an inch margin between the brick positive and the walls of the mold. Since we were casting multiple bricks at once we chose to build a little brick village with clay walls rather than use coddle boards for the walls.
2. Whether you are using clay walls or coddle boards it is mandatory that you seal up all of the seams between the corners and at the meeting of the walls to the surface they are sitting on. Fitting and checking the seams for a tight seal will help you to avoid a “plaster disaster.” In this case we also made the walls very thick since the clay was on the soft side.
3. In addition to leaving about an inch margin around between the walls and brick positive, it is also important build the walls a little over an inch taller than the bricks. The idea here is to leave a strong margin on what will become the bottom of your mold. You want the cast mold to be thick enough that it is strong, but not so thick that it is heavy. When you have your walls built, you are ready to cast!
4. Before you start mixing plaster there are a few things to take care of. We put plastic on the floor with a bag lined bucket nearby to collect any plaster waste and make for easy clean up. You want to take preventative measures to keep any plaster out of your working clay, so we wanted to keep this as contained and tidy as possible. Right before you start mixing, check the seams of the walls to be sure they are tightly pressed to the casting surface and give the inside of your mold a spritz with some soapy water. The soapy water will help keep the plaster from sticking to the brick positive.
5. Now it’s time to start mixing, and there is no turning back! For a non-scientific way to mix plaster, start with about as much water as you’ll need plaster and then swiftly distribute plaster mix into the liquid. Crumble the dry plaster over the surface of the water. Keep adding until the mix starts to keep islands of dry material on the surface of the water. Give the plaster water mix a good stir and start pouring. The plaster will start setting up immediately so there isn’t time to waste.
6. Gently pour the plaster over the positive, being careful to avoid creating any air bubbles. When the pouring is complete give the mold a jiggle (by tapping the table) to help draw any bubbles to the surface.
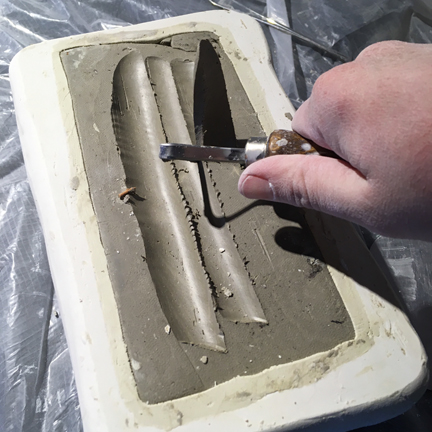
7. Let the plaster set up until it is stiff enough to hold shape, but soft enough to easily cut into. Get to work cleaning up the fresh mold. The idea here is that when you’re done the mold will not have any areas that would flake off plaster in your work space in the future. Start by using a metal rib to scrape away air bubbles and raised sections from the top of the mold. Then release the mold from the clay walls. Shave down the edges of the rim and corners with a rasp and rib as needed.
8. When the outside of the mold is all clean it’s time to start digging out the brick positive. We used an old trimming tool and a spoon to excavate our molds. When working through this process it is important to be mindful of the edges of the clay to avoid gouging the mold by accident. When the walls of the positive become thin enough you should be able to get a grasp on the edge of the positive and peel it out of the mold.
9. Set the molds out to finish drying. When you’re ready to use your mold you can learn more about the brick pressing process from Rickie’s blog- Turn Your Waste into Want..

the mold smoothed with the original ready to remove
carving out the original

the original being removed from the mold

peeling out the original from the mold


