

DIY Spray Booth
/
Make your own SPRAY BOOTH: Repurposing A Pop-corn POPPER
By Deb Schwartzkopf
This little write-up is a description of my home-made spray booth I constructed from a theater popcorn popper and various salvaged building materials back in 2011… This is a throwback from what I have now, but it is a really great way to create a place to spray glaze if you are setting up your own studio on a budget.
Switch to Cone Six
Part of the reason I needed a spray both was because I switched to firing at cone six in an electric kiln. Here are a few of the reasons why.
· I found a cone six clay(Mac 6) that I enjoyed working with by Clay Art Supply in Tacoma Washington- http://clayartcenter.net
· My studio was a rented space. I did not want the expense of building and installing a gas kiln on another person’s property.
· I lived in the city where getting a gas line permit and space for a large gas kiln were limited and expensive.
· I got a good deal on a used electric kiln.
· I love to push the start button and not worry about accidental reduction (I had been firing neutral in a gas kiln for some time with varying success).
Surface Variation
I found myself seeking new solutions to soften glaze application and surface qualities. I used to get these variations by firing in a salt kiln. A salt kiln was my first choice firing option for about six years. Even when I switched to a neutral atmosphere in the gas kiln, without salt, there were areas of unpredictability in terms of partially reduced work.

To get the surface variation I wanted, I NEEDED a spray booth. When I glaze smaller objects I first dip them in a “base” glaze and then spray a different glaze to add variation in color and surface quality. A spray booth made glazing larger pieces easier as well. With larger pieces, I glaze the entire object by spraying layers of glaze. This helps me avoid unwanted drips. Some pieces such as pitchers and covered jars are just too large to comfortably dip into glaze.
Budget and Size were major factors. I started browsing the used building materials stores in Seattle. Second Use (http://seconduse.com), Earth Wise (http://earthwise-salvage.com), The ReStore (http://re-store.org)… They all had potential materials… A stand-up shower insert… A large terrarium, Large, square plastic containers… I could make those work. But then I found it! A movie theatre sized pop-corn popper. I instantly imagined my spray booth.

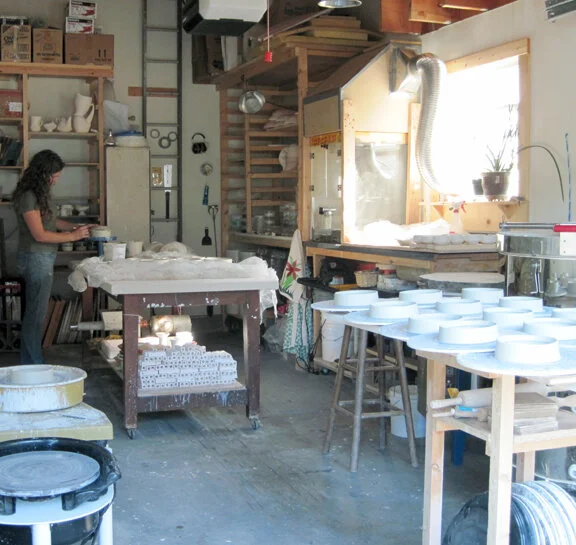
I have now used this spray booth for over two years. It was very inexpensive to make. Probably around $200. It has worked surprisingly well. Glass sides are easy to clean. The small drawer for catching seeds catches the water and glaze as I clean it. The glass sides let light through which I think helps it feel a bit bigger than it is. It is good size for medium to small work, which is what I usually make. It does not take up much space in the studio. This seems like a good point especially if you do not spray that many days in a glazing cycle.
The Downfalls of this design are that the booth itself is on the smaller side. Ideally, I would like to spray a full ware board at a time. I cannot fit a ware board into this set up. So for the last couple years I have been using bats as ware boards when spraying. When the glaze filter is located above the work, it drops glaze bits on the piece being sprayed when it gets full of glaze overspray. Having a second filter on hand is helpful. The last critique I can offer of this design, is that washing the batting filter is a very dusty, dirty job and eventually the batting wares out and needs replacing, and then it is just trash. It would be better if the filter was made of a more durable material.
Repurposing
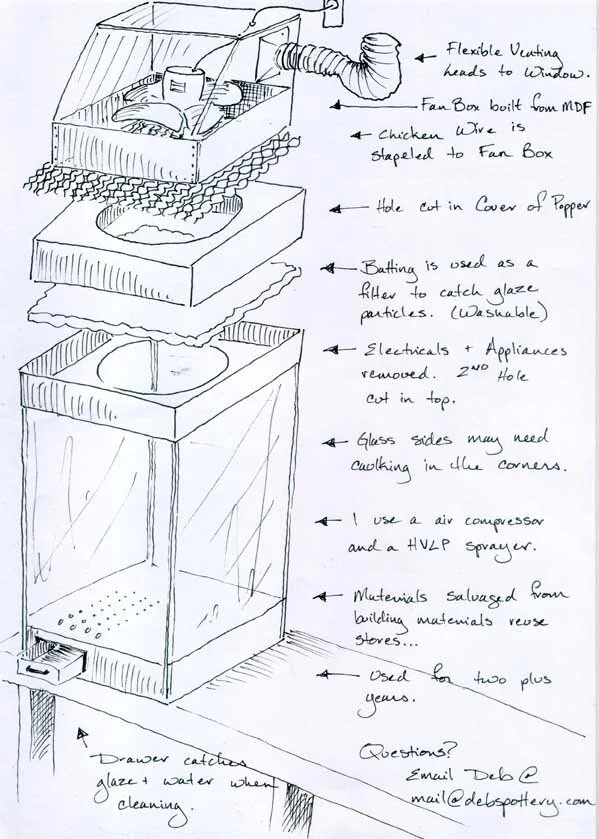
I took out all the inner workings of the actual popping apparatus- the heat light, all the cords which were covered in sticky yellow “butter” and electrical elements from the top. I then got a sawz-all and cut a 20” diameter circle through the two layers in the top section. Cutting the metal was a rattling job. I took the glass out of the walls as I was afraid it might be cracked from the shaking.
I got an old hand-me-down, but strong, hand me down fan from Pottery Northwest where I was previously artist in residence.
I built a box around the fan to sit on top of the booth section. The frame was built out of scraps of 1” x 1” and 2” x 4” boards. The face/ sides of the box were made from left over ¼” MDF and plywood. (I had these on hand from past projects.) All the boards and siding were glued in place to capture as many of the particles as possible. On the bottom of the fan box I stapled the chicken wire.
I also cut a square out from the side of the fan box where the venting attaches…
I got ducting materials from Home Depot and tape. Since I did not have the option to cut a whole in the wall (rental studio) I made a table for the spray booth to sit on and adapted the ducting exit through the window and then cut a cardboard fence to fit around the ducting and block the rest of the opening in the window so cold and and rain could not get in so much.
Between the spraying area and the fan, I used quilt batting as a filter. It sits suspended in the air and when the fan is on, it is pulled against the chicken wire.
I hope this article sparks some other inventive solutions to a spray booth!
Main Materials
Small Theatre Popcorn popper, Strong Fan, Boards, Plywood/ MDF for building box around the fan, Screws/ glue, Chicken wire, Batting (fabric store), Duct tape, Duct pieces for venting, Staple Gun and staples, Sawzall, Jigsaw, Drill, Tin snips, Caulk


